September 24, 2010
How to build a plastic box for a small project |
Hardware | ||||||||||||
|
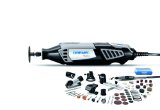
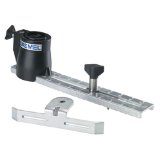
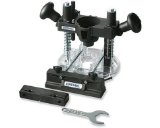
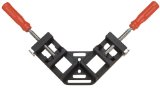
I needed a small box to house some electronic boards for a remotely controlled projection screen project I'm building. The GuruPlug computer I'm using for the project has WiFi on board but no external antenna. A metal box would severely limit the radio waves, if not shield them completely, so I decided to go with a plastic box instead. I couldn't find any plastic boxes that would fit my project, so I decided to build my own. Luckily there is a TAP Plastics store right in downtown Mountain View, and they carry a large selection of plastics. On their web site they have a lot of videos showing what can be done with plastics. It turns out you can build a box using acrylic panels very easily. Acrylic is very easy to cut holes into and you can glue the panels of the box almost as easily as you can glue paper. Check out this video showing how. Below is the finished plastic box. If you don't have the machines at home to cut the panels to length, you can have TAP Plastics cut the pieces for you. I just got a bunch of scrap plastic panels they had on sale for $1 a piece, cut them on my table saw, drilled the holes using a Dremel, and glued them together. The total cost for the box below was $2 (excluding the tools and the time used to build it :) Pictures that document the building process of the box can be found in this Picasa album.
Here are few tips when building your own box:
| |||||||||||||


| Sun | Mon | Tue | Wed | Thu | Fri | Sat |
|---|---|---|---|---|---|---|
| 1 | 2 | 3 | 4 | |||
| 5 | 6 | 7 | 8 | 9 | 10 | 11 |
| 12 | 13 | 14 | 15 | 16 | 17 | 18 |
| 19 | 20 | 21 | 22 | 23 | 24 | 25 |
| 26 | 27 | 28 | 29 | 30 |
 Arduino TinyWebServer:
Apple (44)
Arduino (6)
BeagleBone (1)
Cars (5)
Cocoon (26)
Cool gadgets (14)
Emacs (24)
Google (15)
Hardware (9)
Java (31)
JavaScript (2)
Linux (12)
Music (4)
Open Source (22)
People (2)
Photo (23)
Politics (1)
Random (39)
Travel (4)
Web services (3)
Weblogs (30)
Work (1)
XSLT (12)
January 2015
January 2014
May 2013
June 2011
December 2010
September 2010
August 2010
June 2010
June 2009
May 2009
April 2009
February 2008
November 2007
July 2007
June 2007
May 2007
April 2007
October 2006
August 2006
June 2006
April 2006
March 2006
February 2006
January 2006
December 2005
November 2005
October 2005
September 2005
July 2005
June 2005
April 2005
March 2005
February 2005
October 2004
September 2004
August 2004
June 2004
May 2004
April 2004
March 2004
February 2004
January 2004
December 2003
November 2003
October 2003
September 2003
August 2003
July 2003
June 2003
May 2003
April 2003
March 2003
February 2003
January 2003
December 2002
November 2002
October 2002
September 2002
August 2002
July 2002
June 2002


